
 2. Now you will be working with part A. Sew straight across the cut edge, approximately 1.5 in (about 3.8 cm) in.
 3. Still working with piece A, turned inside-out, flip the piece so the sewed edge is closest to you (if you're working on a table). Imagine the piece's corners form triangles; you will sew the hypotenuse of the triange (see pic).
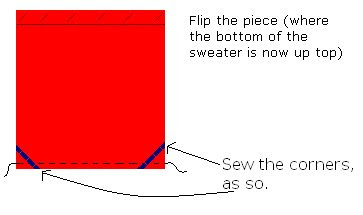 4. If you wish to create a tote (where there is little shaping, just a plain tote shape), you will move on to step 5. If you wish to create a hobo bag, pich six small segments (the size is your choice, mine were about 1/2 inch thick piches), evenly distributed around the entire upper edge of the purse. You will not sew these pinches, with your choice of sewing length, creating some shaping.
 5. Now, you may turn your piece right-side-out; you will need portion A later. Now, get out both of your sleeves (part B). Cut the inner-arm seams out, and lay the sleeves flat (right-side facing you). You will now create a curve, by cutting around the curve of the shoulder and down the sides of the arm, as in the pic.
 6. Now, take the strip of fabric you have just created, and fold the cut edges together so that the wrong side is facing out, and sew shut, creating curved tubes. Now, you need to turn these tube right-side-out, using a safety pin, pinning one end and pulling this end through the tube. You will now cut two, 4 inch segments from one tube, and discard the remaining segment of this tube. Now, get out your metal rings, and loop each end of your other tube around a ring, and sew securely, like here:
 7. Now, you will secure your tubed strap into the inside of your part A bag, by folding over the 4 in tube segments, inserting through one of the rings, and sewing into the intererior of the bag, like in the pic. Do this on both sides of the bag, creating a strap.

8. Now, the shell of your purse is complete, see next tutorial for lining the purse!
I will post pics of my finished shell soon!


No comments:
Post a Comment